

I’m so excited to be sharing my first art DIY tutorial! I’ve been painting a handful of mugs on commission recently and you guys have seemed to enjoy seeing the finished mini paintings on Facebook. I personally have a lot of fun painting scenes on ceramics and wanted to make a DIY painting tutorial so anyone interested can do it too! It makes for a fairly quick, fun, inexpensive and homemade gift for friends and family (or for yourself- you’re allowed to make cool stuff for yourself, too ;D).
The Details-
This mug takes about 20-30 minutes to paint the design (more or less depending on your speed), 1 hour more to let the paint dry, another 30 minutes to bake the paint onto your mug in the oven, and another 30- 40 minutes for mug cooling (cool time varies).
So this project can be completed in about 3- 4 hours.
You can create many variations of this project if you’re adventurous (using different cup colors and different paint shades for example). Have fun with it!
I use Folk Art Enamel Acrylic paints for my ceramic paintings and when cured/baked, they are top-rack dishwasher safe! Hooray! No microwaving though. Heat up liquids in a separate container and then transfer to this mug. You don’t want to mess up all your hard work.
Let’s get started!
What You’ll Need:
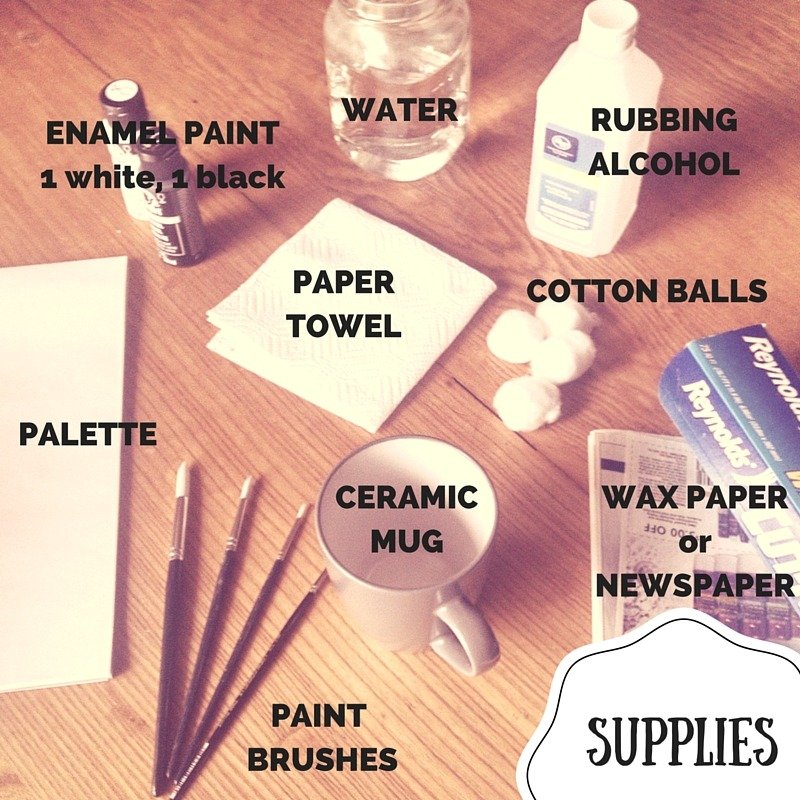
Supply List:
- 1 clean/washed ceramic mug
— light or medium grey. Thrift stores, dollar stores, and craft stores are great places to find inexpensive mugs for paintings. Be sure to wash off any stickers/glue. - Enamel Acrylic Paint 2 ounce tubes (1 tube black, 1 tube white)
— I used Folk Art Enamel Acrylics for this project. You can find bakeable enamel acrylics at most craft supply stores. They run $3- $4 a tube and last for quite a while. I often find Folk Art Enamel Acrylics at Michaels or Jo-Ann Fabric stores - Palette to place paint on
— This can be a real palette, disposable paper palette, paper plate, or anything you don’t mind mixing paint on - Paint Brushes
— various sizes (small to medium are probably best for this project. You can find inexpensive packs of paint brushes $3 – $5 at your local craft store) - Cup of water
— for cleaning your brush - Rubbing Alcohol
— can be found at local grocery store or drug store - Cotton Balls
— 1to 2 balls should be plenty - Wax Paper or Newspaper
— used underneath your mug so you don’t get paint on your work space - **OVEN**
— an oven is necessary to quickly cure your painted mug. If you don’t have an oven, the mug can air-cure in about 28 days (you cannot use it until it is cured or water will destroy your painting). Check your enamel acrylic bottle’s instructions to see required time for air cure.
OPTIONAL SUPPLIES:
- Cookie Sheet or Glass Baking Dish — (I like to put my mugs on something so I can more easily move them in and out of the oven, especially if I am baking more than one mug at a time).
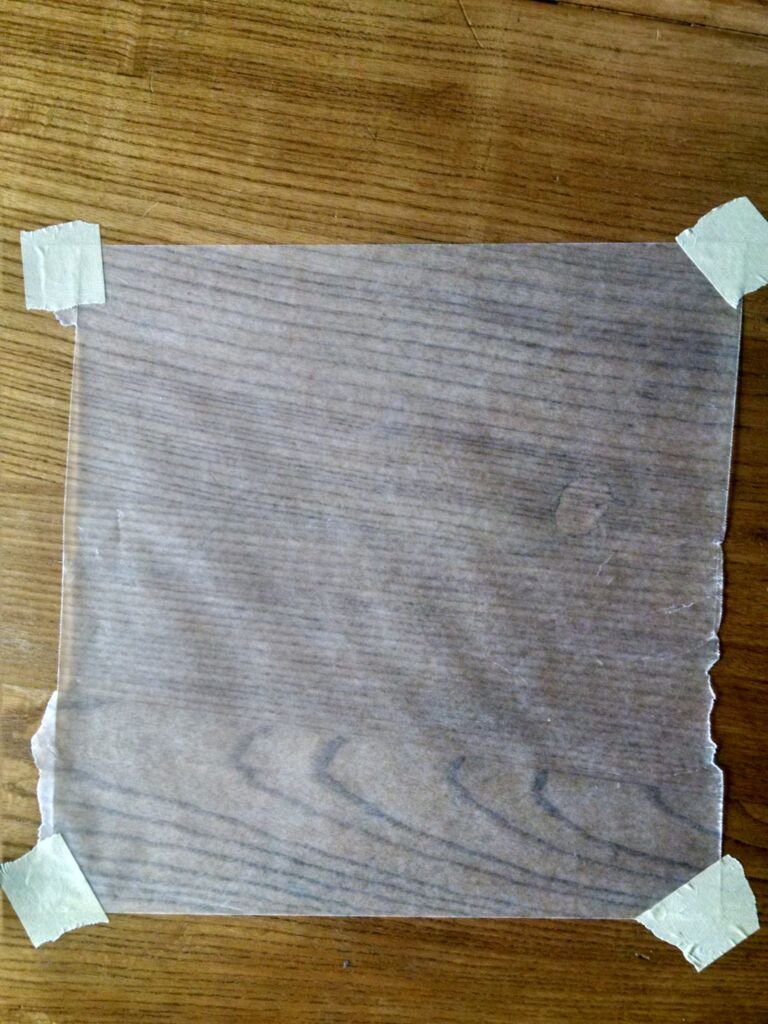
- Masking Tape or Scotch Tape — I like to tape my newspaper or wax paper down so it doesn’t move around while I’m working
Step 1:
Put down your Newspaper or Wax Paper to prep your work space. You don’t want to get paint on your tables or counters. I like to tape my paper down with masking tape so it doesn’t move around while I’m working.
Step 2:
Open your bottle of rubbing alcohol and pour some onto a cotton ball. Just enough to cover one side of the cotton ball should be enough. We will be using this to remove any oils that might be on your mug.
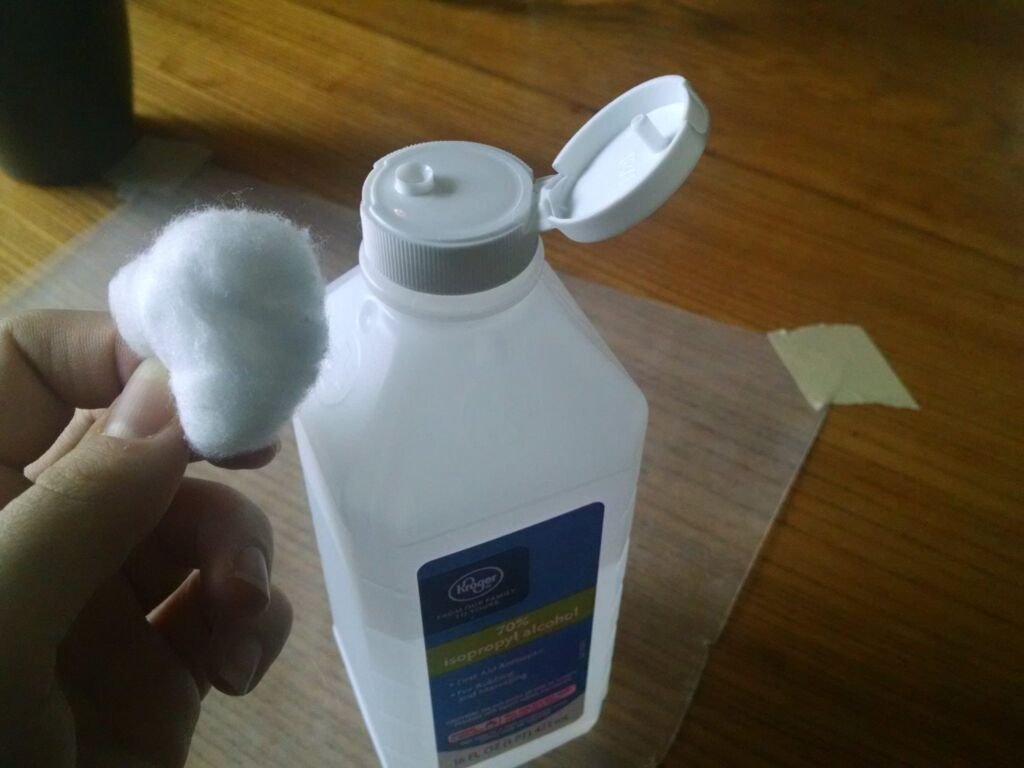
Step 3:
Take your rubbing alcohol-covered cotton ball and wipe down the entire mug. From here on out, try to only touch the handle (because we won’t be painting it) or just touch the top and bottom edges of the mug. Don’t touch anywhere you will be painting with your fingers. The oils can make the paint bubble and melt off in the oven when you bake it.

Step 4:
Pull out your enamel acrylic paint. We will be using black paint and white paint for this project. I personally used Folk Art enamel paints in Wicker White and Licorice, but you may be able to find some other bakeable enamel paints. Be sure to use paints that are bakeable if you want to quickly cure your mug (rather than wait 28 days to air-cure). You can read if your enamel paints are bakeable on the back of your paint tube.

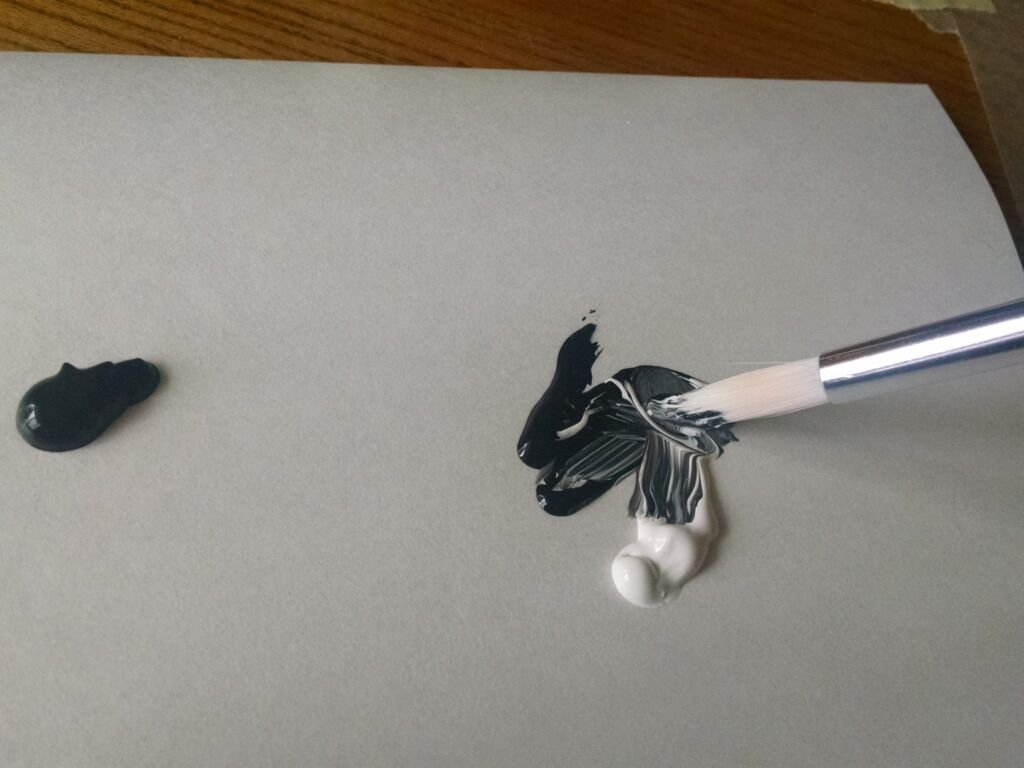
Step 5:
Squeeze a bit of black paint onto your palette, then in a different section of your palette, pour a little bit of black and a little bit of white next to each other.

Step 6:
Take one of your brushes (or a Popsicle stick) and mix the second area of black and white paint together on your palette to form a grey tone. You want the grey tone to be a shade or two darker than the grey of your mug. If you need to make it lighter or darker, just add a little more black or white until the desired color is created. Now you have the two main colors for the mug ready (black and your grey shade).
Step 7:
If you used a brush, rinse your brush in your water thoroughly. During this project, be sure to rinse your brushes before you change colors.
Step 8:
If you had to rinse a brush, dry it completely on your paper towel. For this ceramic painting project, it is very important that you remove as much water from your rinsed brush as possible before painting. Water weakens the bond in the enamel acrylic paint so it won’t stick as well to your mug and will be more likely to bubble during baking or wash off. Gently press your brush on the paper towel and/or press and squeeze the paper towel on your bristles until you no longer get any moisture out.

Step 9:
Now we’re ready to paint! We will start by painting the distant trees using the grey color you made. Take a medium or small paintbrush, dip it in your grey paint, and make vertical “tree trunk” marks across your whole cup starting about 1/3 of the way up from the bottom of mug. These should be random (different spacing) and can vary in thickness.

Step 10:
Pick up some more grey paint on your brush and begin making downward diagonal strokes down each of your tree trunks. These strokes can be random spacing and different thicknesses, the more irregular your strokes, the more realistic your tree silhouettes will end up looking anyway, so don’t stress out about this part. It doesn’t need to be perfect. Just have fun with it. As you get toward the bottom of your trees, fill in the spaces with more grey paint for a fuller look.

Step 11:
When you’re done creating all your grey tree shapes, rinse your brush and wait 5- 10 minutes for the grey paint to dry.
Step 12:
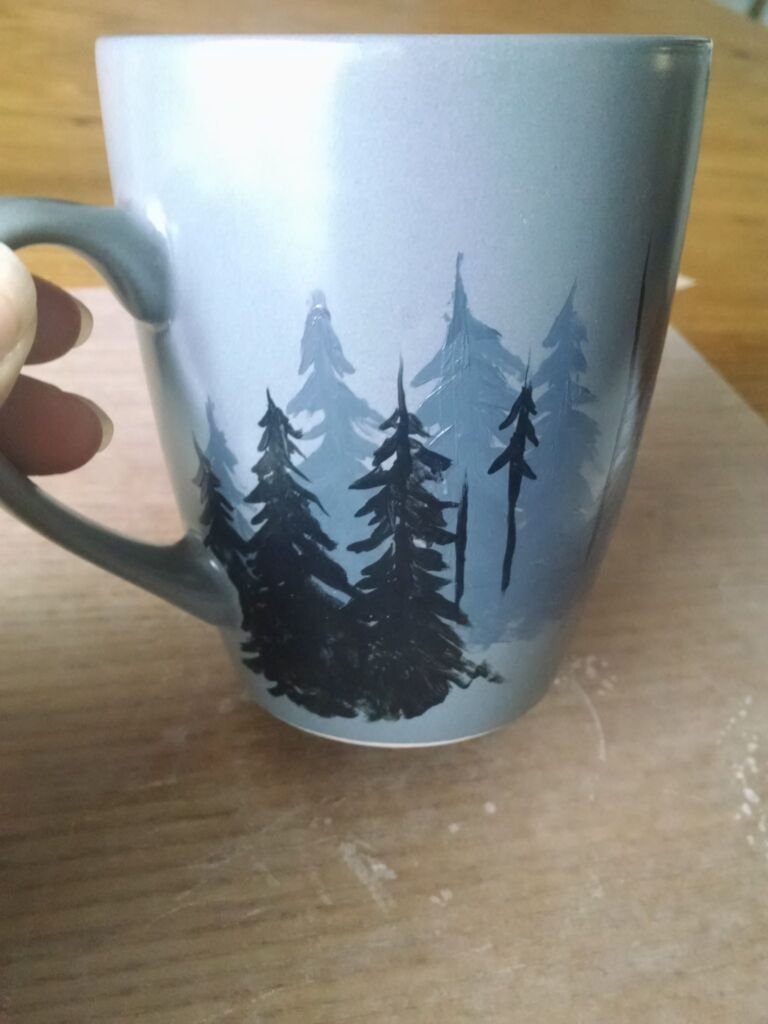
When the grey paint is dry, grab a clean brush, dip it in the black paint you put on your palette, and make more “tree trunk” vertical strokes over top of your grey trees. The black trees are going to be your foreground. Put some of the trunks in between your background trees and have a few more in line with them. They can all be different heights and widths as well. Again, fairly random is going to make it more natural so don’t feel like it has to be perfect.

Step 13:
Just like with the grey trees, you’ll need to make branches for the black trees. Make downward diagonal strokes on each of the trunks to form the trees. Fill the bottom area of the trees with black paint, leaving a little bit of space above the very bottom of the mug (where the mug’s actual grey color shows through).
Step 14:
You’re done painting your tree silhouettes! Go ahead and clean your brush and let it dry for a couple of minutes.
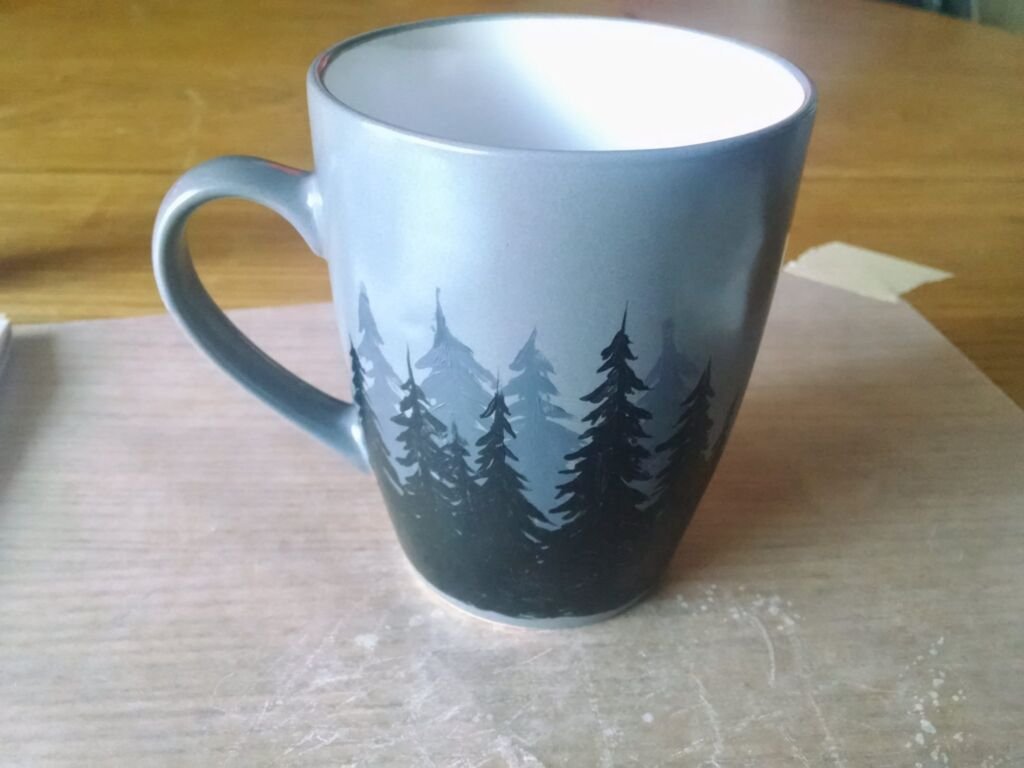
Step 15:
Now it’s time to paint the stars and moon. Squeeze some of your white paint onto your palette. You won’t need a lot of it.

Step 16:
Take a smaller brush (or just gently use the tip of a medium brush) and dip it in your white paint. Make random dots in the sky to create stars.
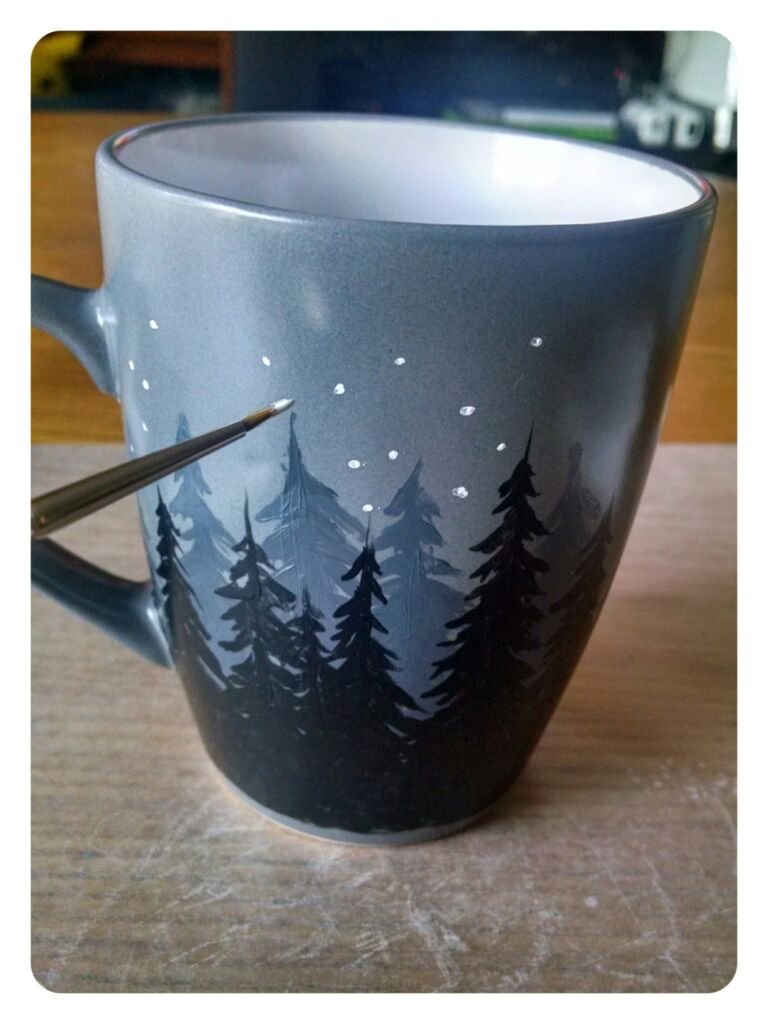
Step 17:
Find an area that’s a little more open and paint/fill in a circle to create a moon. It will be a little patchy. After letting it dry for a couple minutes, you can go over it with a second coat mostly in the center of the circle. leaving it a little patchy on the edges will make it seem a little more “glowy”. Finish up any more stars you need to make.

Step 18 – Drying:
You’re done with the actual painting! Congratulations! Clean your brushes and work space. Now you’ll need to let your painting sit and dry for 1 hour. (or however long the instructions on your enamel paint bottle instruct).
Step 19 – Baking:
Once your mug painting has dried the appropriate time, you’ll need to bake it to cure the paint.
When I bake my mugs, I like to set them on a cookie sheet or in a glass baking dish so they are easier to move in and out of the oven.
To bake, put your mug into a COLD OVEN *it is important that your oven is NOT preheated so the mug doesn’t crack from harsh temperature changes* and turn your oven to 350 degrees F.
So your mug and oven will be heating up at the same time. Set a timer for 30 minutes and go have a tasty snack.
When your timer goes off, turn off your oven but leave your mug inside to cool down. DO NOT remove it right away.
If you remove it while it’s still super hot, your mug may crack due to extreme temperature changes. Leave your hot mug in your oven for about 45 minutes before opening and removing to be safe.
NOTE– *Some enamel paint bottles recommend allowing the mug to sit another 72 hours after baking to further strengthen the bond to the ceramic. If you have time for this, it wouldn’t be a bad idea. However, I have washed a painted, baked mug in the dishwasher the same day I baked it and the painting was still perfectly in tact, so I think if you would like to use it sooner, you’ll be just fine. Try not to scrub it intensely the first few days after baking if you’re worried about it. 🙂

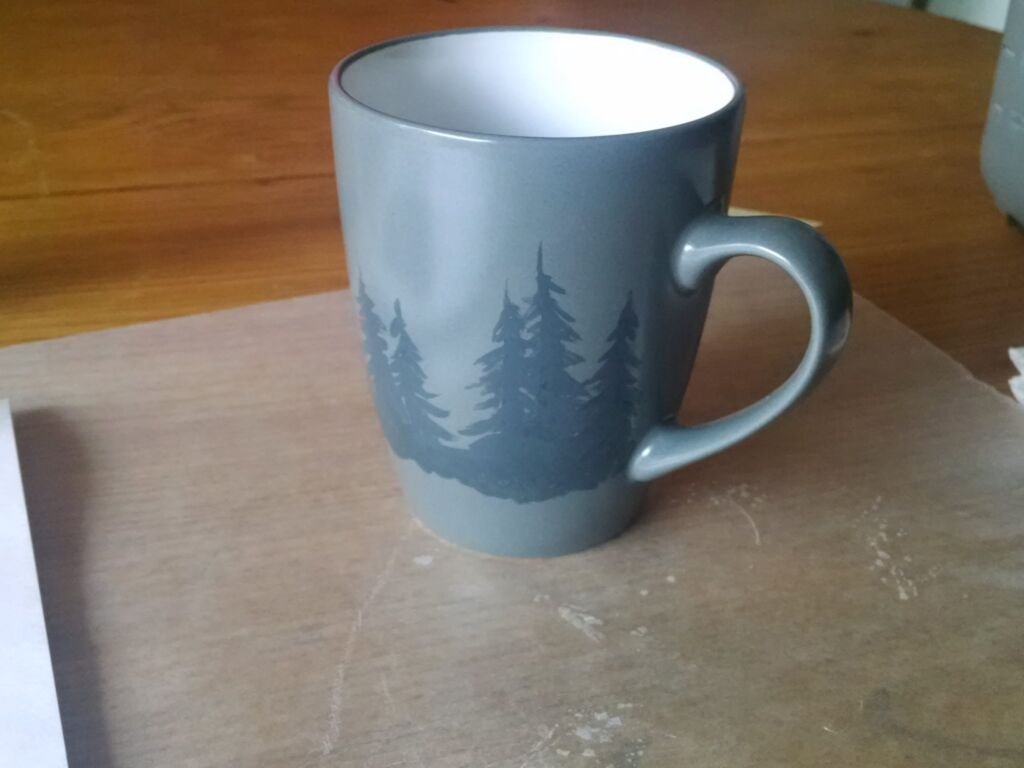
And that’s it! You painted your very own Dark Forest mug! I hope you enjoyed the project. Let me know if you have any questions about anything in the comments section below. If you make this project, I would LOVE to see your finished mugs. You can post pics of your mugs on my business facebook page if you want!
Happy Holidays!
Hi! A regular kitchen oven will do?
Hi Yanin– yup, a regular kitchen oven will work! I’ve used both electric ovens and gas-powered ovens. I’ve found gas-powered ovens fluctuate in temperature a bit more inside, so it’s helpful to have an oven-safe thermometer inside to make sure your temp is accurate. If you’re using an oven that you also use for food, it’s also probably a good idea to clean your oven before you cook food in it again. When paints are drying regularly or baking, they may slowly release some fumes, so it wouldn’t hurt to clean out just in case anything’s still hanging out in there on the walls.
If you plan to do a lot of bake-crafting of smaller items (like polymer clay baking, enamel paint baking, etc.), you might prefer to have a separate little toaster oven just for your non-food crafts to bake in.
Good morning. Beautiful cup🥰.
I tried using folkart paint with a store bought stencil and the design came out ok. But after baking the paint is easily removed. Any suggestions?
Hi Itrula! Glad you gave cup painting a try! 😀
Just in case, I would first double check that you picked up the Folk Art paints for ceramics (sticker of a cup on the top of the lid) instead of another type, as Folk Art does have a variety of specialty craft paints for other uses. I’m assuming you probably have the right paint, but thought I’d mention that just in case! 🙂
Even when using the correct Folk Art paint, I’ve also personally experienced a couple occasions where it didn’t bond well after baking.
So here are a couple things that I’ve noticed have caused the non-adhering paints for me before:
1) The cup had some oils from my hands left on the surface before painting. Cleaning the surface with the alcohol helps cut down on that possibility.
2) The paint may have been laid on too thinly. I’ve found that if the layers aren’t quite thick enough, they don’t really adhere very well and don’t hold up in washing. Maybe give it another try and either paint a thicker layer initially, or paint on a couple extra layers of paint on (after waiting for the first layers to dry) to try and thicken it up a bit. I’ll add the note about the thin paint to the post in case it helps!
If you try it again, I’d love to know how it turns out for you! Also, if Folk Art brand is giving you trouble, I believe Americana and Delta are a couple other brands that offer a ceramic acrylic off the top of my head. I haven’t personally tried those ones yet though so don’t know how they compare.
Can we do it with other paints? I mean with a rapid pen or some other types of pens for illustration painting
Hey Donya, I’ve personally only tried paints labeled as “enamel” so far. However, I’ve heard about a few other mug art approaches.
If you’re looking for a pen-drawing kind of experience, you could look into porcelain paint markers. A couple brands I’ve heard about are Pebeo and Zeyar. I also recall reading somewhere that maybe Sharpie brand oil paint pens can be used successfully for a more permanent mug art as well. They are a special type of Sharpie– not just the regular run-of-the-mill Sharpies. With all these special pens, I believe you still have to heat-set the art in an oven to make a strong bond on the mug.
Like I said, I haven’t tried any of these pen options myself so can’t say how great they work or not, but hopefully that gives you a few jumping-off points for research! 🙂
Nice to follow tutorial. Great job.
Wow!!! Wonderful tutorial.. Brilliant work..
Is this microwave safe??
The manufacturer of the paints I used (Plaid- FolkArt) doesn’t recommend that you put your finished paints in the microwave.
However, I have tested it out a few times to see what would happen but only put a finished painted mug in for about 30 seconds at a time. I didn’t notice any bubbling or issues of any kind personally but I’m not sure if there are any long term effects of doing it frequently. I just sent a message to the manufacturer to see if I could get some additional info of why they don’t recommend it. Hopefully I’ll hear back soon. As soon as I do I’ll add a note on my post and let you know in this comment thread. 🙂
Your mug is so so pretty. I’m definitely gonna make. Thanks for the instructions
Is it necessary to seal the paint with anything to keep it from coming off? Or does the baking take care of that?
By the way, I LOVE the mug!
Nope! Once you bake the enamel acrylics they cure and are water resistant. You can even put them in the top rack of the dishwasher a couple days after you bake them! If you use a different brand of enamel paint than I did, you can check the back of the tube to read how their paints cure.
So glad you like it! If you ever make it I’d love to see how it turns out. Let me know if you have any more questions. 🙂